Can't help myself - I LOVE mixed media. The improvisational attitude, the fearlessness with materials and techniques, the flat-out creativity - it all makes my brain sing and my fingers itch. So - I thought it might be fun to try a tutorial of sorts, blogging my way through creating a piece. These techniques are widely available all over mixed media publications - I read, listen, experiment, and study and then just PLAY. So... here we go.
It all started with a piece of REALLY good paper left over from a summer workshop and 3 new luscious fluid acrylic paints I had just added to my paint "stash." The paper was wet, drops of paint added and then spritzed with water from a spray bottle to make the paint travel through the damp.
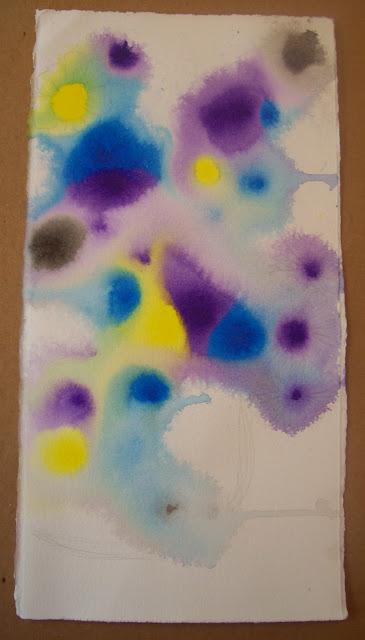 |
| OOOhh... Color on paper!! |
|
|
|
Next, I began looking for shapes in the color blotches. My mind frequently goes to floral shapes, so I just let it have its way. I started outlining those shapes in pencil and then later added outlines with fine-tipped colored markers. Leaves and a few stems were suggested throughout the mass of flowers,
and things started to feel like they were working together.
 |
| Shapes being penciled in |
 |
| Various colored markers used to outline shapes |
After the floral shapes were roughed in and a container loosely defined, background colors began to be added. I learned some new things this summer about making color choices with the color wheel in mind, so I tried to make use of that as I selected the rest of the colors. I also spattered tiny drops of black paint over the picture to give it more interest.
 |
| Background colors going in |
|
 |
| Close up - just for fun! |
The container wasn't working for me and I wasn't sure what to do with it. Finally I decided to collage paper over the paint to give the container more heft. Rooting through my collection of papers, I found a wonderful hand-made,basket-textured Mexican paper given to me by my friend, Karen, who brings back magical things from her travels. Now, how to fit the paper around the already existing shapes... hmmm. Drag out the carbon paper and a stylus. Sandwich stack made with handmade paper on bottom, carbon paper next and painting on top. Stylus used to draw around the floral shapes and ..VOILA!!... the lines are on the handmade paper to be cut out and fit around the flowers! The paper was attached with matte gel medium and then the whole painting given a coat of gel medium to protect it and allow other layers to be added and subtracted without damaging the first layer.
 |
| Paper cut and ready to be added to make the container more interesting |
A little watered-down paint was added to the container shape with my finger to give it shadow and dimension, blended soft pencil was used to give the flowers and leaves more depth.
 |
| Some shading added |
|
 |
| Looking closer |
Now the background seemed a bit too intense, so slightly watered-down off-white paint was stippled over some areas of the wild coral color. I thought it might be finished.
 |
| ALMOST finished. |
A closer look convinced me it needed just a touch more definition, so I used a very fine Micron pen to add touches of line work, giving it more clarity and definition.
 |
| FINISHED!! | |
This was great fun. Most creating is!! I hope you get a yen to do a project of your own. Just get fearless and jump in!! If you don't like a layer, cover it up with paint, paper, fabric and create a new layer. Or cut it up and glue the pieces to something else. Try something different and keep going. It's all about the process, it's all about the fun!!


AWESOME Betsy! I love it and the way you described your process! Thanks!
ReplyDelete